Wednesday, August 27, 2014

Reusable command line code coverage using MSTest

Its a universal fact that running tests and code coverage using Visual Studio takes up a lot of time and resources and eventually you need to reboot your machine to get back to speed when yours is a big solution with lot of tests and projects.

Running Tests via command line is a very effective solution to above mentioned problems.

Nam G has an excellent post about how to proceed with it. Hence i have just provided the batch file here which can be useful and be shared. Make sure you run this batch file in the VS command prompt.
Just copy the below code in notepad and save it as batch file

 cd C:\Program Files (x86)\Microsoft Visual Studio 12.0\Team Tools\Performance Tools  
 erase H:\coverage\*.*  
 vsinstr /coverage %1  
 vsperfcmd /start:coverage /output:H:\coverage\code  
 mstest /testcontainer:%2 /test:%3 /resultsfile:H:\coverage\testResults.trx  
 vsperfcmd /shutdown  

Explanation of above script is as below :
"H:\Coverage" is the base directory where we will store all the output files, you can changes this as per your wish. Just make sure to change the same in entire script though.

%1, %2, %3 are all the parameters that script needs.

%1 is the path of the dll that you want the cover via code coverage. The path is the same as your Test Project output directory. For eg, if you have a project called Web, and correcponding Test project, the path for %1 would be Test/bin/Web.dll  and not Web/bin/Web.dll.

%2 is the path of Test dll

%3 is the name of Test as per MSDN, you can directly use the Name of your TestClass as well.

Line 1 change the path of the prompt to the performance tools directory where commands like vsinstr etc are housed.
Line 2  Delete all the previous execution output files from our base directory
Line 3  instrument our class to be covered
Line 4  Set the coverage output file.  In the script above code is the name of the file
Line 5 Run all the test using MSTest and specify the results file path.
Line 6 shutdown the monitoring

If you excute the script above , There should be a file "code.coverage" which can be opened in Visual Studio and you can see all the coverage details the way you have been doing. And the file testResults.trx can also be opened in VS and will list the details of Test run.  

Wednesday, November 20, 2013

How to insert entities into Azure Table Storage using Powershell.

In order to insert entities into Azure Table storage while executing powershell scripts, for example IAAS scripts where you want to log any kind of deployment information, this is one of the approach that can be followed. Ofcourse the code is not optimized, but you get the idea of how to go about.

In the code below, at runtime, we define the entity that you want to log. Remember, as per the table storage requirements, the PartitionKey and RowKey is mandatory and rest of the fields can be anything you want.

Advantage of creating an entity at runtime is that you dont have to deploy any C# dll along with powershell scripts which would make things simple.

Add-Type -Path "C:\Program Files\Microsoft SDKs\Windows Azure\.NET SDK\v2.2\ref\Microsoft.WindowsAzure.Storage.dll"

$refs = @(
"C:\Program Files (x86)\Reference Assemblies\Microsoft\Framework\.NETFramework\v4.5\System.Data.Services.Client.dll")

$code = @"

using System;
using System.Data.Services.Common;
    
    [DataServiceEntity]
    public class LogEntity
    {
        public string PartitionKey { get; set; }
        public string RowKey { get; set; }
        public string Client { get; set; }
        public string Criteria { get; set; }
        public string DeploymentID { get; set; }
        public string MachineName { get; set; }
       
    }


"@

Add-Type -ReferencedAssemblies $refs -TypeDefinition $code
    
$accountName = "youraccountname"

$accountKey = "youraccountkey"

$credentials = new-object Microsoft.WindowsAzure.Storage.Auth.StorageCredentials($accountName, $accountKey);
 
$uri = New-Object System.Uri("http://yourstorageaccount.table.core.windows.net/");
   
$tableClient = New-Object Microsoft.WindowsAzure.Storage.Table.CloudTableClient($uri,$credentials);
  
$table = $tableClient.GetTableReference("log"); # here log is the table name you want
$table.CreateIfNotExists(); 
$entity = New-Object LogEntity;
$entity.PartitionKey = "p4";
$entity.RowKey="r4";
$entity.Client="C1";
$entity.Criteria = "crit";
$entity.DeploymentID = "D1";
$entity.MachineName = "M1";

$context = $tableClient.GetTableServiceContext();
$context.AddObject("log", $entity); 
$context.SaveChanges(); 

Thursday, January 10, 2013

Tips to improve Performance/Scalability of WCF Service hosted in IIS7.5


This is nothing new. In fact there are numerous posts/articles scattered all over hence in this post, my aim is to consolidate and organize the tips already published by well known authors to make life bit easier when you need to throttle your WCF Service using .Net 4.0

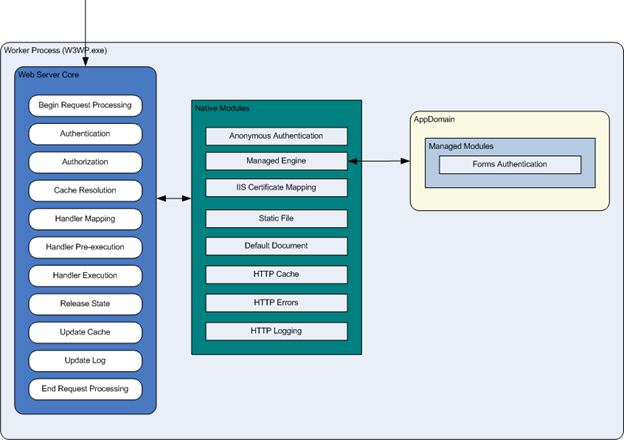
But before we start, i would suggest its better have a good understanding on entire request handling pipeline right from IIS in order to understand what settings below do when you change them.
System.net Changes

If your ASP.NET application is using web services (WFC or ASMX) or System.Net to communicate with a backend over HTTP you may need to increase connectionManagement/maxconnection. For ASP.NET applications, this is limited to 12 * #CPUs by the autoConfig feature. This means that on a quad-proc, you can have at most 12 * 4 = 48 concurrent connections to an IP end point. Because this is tied to autoConfig, the easiest way to increase maxconnection in an ASP.NET application is to set System.Net.ServicePointManager.DefaultConnectionLimit programatically, from Application_Start, for example. Set the value to the number of concurrent System.Net connections you expect your application to use. I've set this to Int32.MaxValue and not had any side effects, so you might try that--this is actually the default used in the native HTTP stack, WinHTTP. If you're not able to set System.Net.ServicePointManager.DefaultConnectionLimit programmatically, you'll need to disable autoConfig , but that means you also need to set maxWorkerThreads and maxIoThreads.


ASP.NET Pipeline Optimization

There are several ASP.NET default HttpModules which sit in the request pipeline and intercept each and every request. For example, SessionStateModule intercepts each request, parses the session cookie and then loads the proper session in the HttpContext. Not all of these modules are always necessary. For example, if you aren't using Membership and Profile provider, you don't need FormsAuthentication module. If you aren't using Windows Authentication for your users, you don't need WindowsAuthentication. These modules are just sitting in the pipeline, executing some unnecessary code for each and every request.

The default modules are defined in machine.config file (located in the $WINDOWS$\Microsoft.NET\Framework\$VERSION$\CONFIG directory).

<httpModules>
  <add name="OutputCache" type="System.Web.Caching.OutputCacheModule" />
  <add name="Session" type="System.Web.SessionState.SessionStateModule" />
  <add name="WindowsAuthentication"
        type="System.Web.Security.WindowsAuthenticationModule" />
  <add name="FormsAuthentication"
        type="System.Web.Security.FormsAuthenticationModule" />
  <add name="PassportAuthentication"
        type="System.Web.Security.PassportAuthenticationModule" />
  <add name="UrlAuthorization" type="System.Web.Security.UrlAuthorizationModule" />
  <add name="FileAuthorization" type="System.Web.Security.FileAuthorizationModule" />
  <add name="ErrorHandlerModule" type="System.Web.Mobile.ErrorHandlerModule,
                             System.Web.Mobile, Version=1.0.5000.0,
                             Culture=neutral, PublicKeyToken=b03f5f7f11d50a3a" />
</httpModules>

You can remove these default modules from your Web application by adding <remove> nodes in your site's web.config. For example:

<httpModules>
         <!-- Remove unnecessary Http Modules for faster pipeline -->
         <remove name="Session" />
         <remove name="WindowsAuthentication" />
         <remove name="PassportAuthentication" />
         <remove name="AnonymousIdentification" />
         <remove name="UrlAuthorization" />
         <remove name="FileAuthorization" />
</httpModules>

The above configuration is suitable for websites that use database based Forms Authentication and do not need any Session support. So, all these modules can safely be removed.


ASP.NET Process Model Changes

Process Model configuration defines some process level properties like how many number of threads ASP.NET uses, how long it blocks a thread before timing out, how many requests to keep waiting for IO works to complete and so on. The default is in most cases too limiting. So, the process model configuration can be tweaked to make ASP.NET process consume more system resources and gain better scalability from each server.

A regular ASP.NET installation will create machine.config with the following configuration:

<system.web>
   <processModel autoConfig="true" /> 

You need to tweak this auto configuration and use some specific values for different attributes in order to customize the way ASP.NET worker process works. For example:

<processModel
   enable="true"
   timeout="Infinite"
   idleTimeout="Infinite"
   shutdownTimeout="00:00:05"
   requestLimit="Infinite"
   requestQueueLimit="5000"
   restartQueueLimit="10"
   memoryLimit="60"
   webGarden="false"
   cpuMask="0xffffffff"
   userName="machine"
   password="AutoGenerate"
   logLevel="Errors"
   clientConnectedCheck="00:00:05"
   comAuthenticationLevel="Connect"
   comImpersonationLevel="Impersonate"
   responseDeadlockInterval="00:03:00"
   responseRestartDeadlockInterval="00:03:00"
   autoConfig="false"
   maxWorkerThreads="100"
   maxIoThreads="100"
   minWorkerThreads="40"
   minIoThreads="30"
   serverErrorMessageFile=""
   pingFrequency="Infinite"
   pingTimeout="Infinite"
   maxAppDomains="2000"
/>

Here all the values are default values except for the following ones:

  • maxWorkerThreads - This is default to 100 per CPU. On a dual core computer, there'll be 200 threads allocated for ASP.NET. This means at a time ASP.NET can process 200 requests in parallel on a dual core server. If you have an application which is not that CPU intensive and can easily take in more requests per second, then you can increase this value. Especially if your Web application uses a lot of Web service calls or downloads/uploads a lot of data which does not put pressure on the CPU. When ASP.NET runs out of worker threads, it stops processing more requests that come in. Requests get into a queue and keep waiting until a worker thread is freed. This generally happens when a site starts receiving much more hits than you originally planned. In that case, if you have CPU to spare, increase the worker threads count per process.

  • maxIOThreads - This is default to 100 per CPU. On a dual core computer, there'll be 200 threads allocated for ASP.NET for I/O operations. This means at a time ASP.NET can process 200 I/O requests in parallel on a dual core server. I/O requests can be file read/write, database operations, web service calls, HTTP requests generated from within the Web application and so on.
  • minWorkerThreads - When a number of free ASP.NET worker threads fall below this number, ASP.NET starts putting incoming requests into a queue. So, you can set this value to a low number in order to increase the number of concurrent requests. However, do not set this to a very low number because Web application code might need to do some background processing and parallel processing for which it will need some free worker threads.
  • minIOThreads - Same as minWorkerThreads but this is for the I/O threads. However, you can set this to a lower value than minWorkerThreads because there's no issue of parallel processing in case of I/O threads.
  • memoryLimit - Specifies the maximum allowed memory size, as a percentage of total system memory, that the worker process can consume before ASP.NET launches a new process and reassigns existing requests. If you have only your Web application running in a dedicated box and there's no other process that needs RAM, you can set a high value like 80. However, if you have a leaky application that continuously leaks memory, then it's better to set it to a lower value so that the leaky process is recycled pretty soon before it becomes a memory hog and thus keep your site healthy. Especially when you are using COM components and leaking memory. However, this is a temporary solution, you of course need to fix the leak.


Things Improved in WCF 4

In WCF 4, the default settings are much relaxed and carefully calculated to make best balance of CPU and threads. Here's what the default configuration is according to WCF team member's blog post:

In WCF 4, we have revised the default values of these settings so that people don’t have to change the defaults in most cases. Here are the main changes:

  • MaxConcurrentSessions: default is 100 * ProcessorCount

  • MaxConcurrentCalls: default is 16 * ProcessorCount

  • MaxConcurrentInstances: default is the total of the above two, which follows the same pattern as before.

Yes, we use the multiplier “ProcessorCount” for the settings. So on a 4-proc server, you would get the default of MaxConcurrentCalls as 16 * 4 = 64. The basic consideration is that, when you write a WCF service and you use the default settings, the service can be deployed to any system from low-end one-proc server to high-end such as 24-way server without having to change the settings. So we use the CPU count as the multiplier.

We also bumped up the value for MaxConcurrentSessions from 10 to 100. Based on customer’s feedback, this change fits the need for most applications.

Please note, these changes are for the default settings only. If you explicitly set these settings in either configuration or in code, the system would use the settings that you provided. No “ProcessCount” multiplier would be applied.


 HTTP.sys kernel queue limit

  • Increase the HTTP.sys queue limit, which has a default of 1000. If the operating system is x64 and you have 2 GB of RAM or more, setting it to 5000 should be fine. If it is too low, you may see HTTP.sys reject requests with a 503 status. Open IIS Manager and the Advanced Settings for your Application Pool, then change the value of "Queue Length".


processModel/requestQueueLimit

configuration limits the maximum number of requests in the ASP.NET system for IIS 6.0, IIS 7.0, and IIS 7.5. This number is exposed by the "ASP.NET/Requests Current" performance counter, and when it exceeds the limit (default is 5000) we reject requests with a 503 status (Server Too Busy).

A Complete picture of Asp.Net/WCF Request Handling Pipeline


In order to understand the Asp.Net/WCF Request pipeline, i feel its important to look into the complete picture involving IIS,Asp.Net & WCF. And why would one need to understand the pipeline? There can be many reason for it, may be the performance aspect encountered during load testing, extending the built in functionality, or just for the sake of it.

 And for this one should know how each of these components work individually first and then are integrated together to provide the functionality that a developer generally never bothers to think about.

For me it started with throttling a WCF Service to handle very high load with low latency, and ofcourse as per my previous post you can simply follow some known throttling steps and be done with it. But if at all you feel like knowing how exactly the disparate components get along and do what they do, i have this series of posts which again mostly consolidates and organizes most of the information from existing sources but in a relevant flow to provide sequential understanding.

We will start with :
  1. IIS
  2. Asp.Net/WCF Integration in IIS
  3. Threads involved in processing requests
  4. Non Http based WCF Hosting using WAS.

Monday, July 25, 2011

Working with WCF Web Api 4.0 for Hypermedia (HATEOAS)


I wanted to enable Hypermedia - (HATEOAS) support in an existing WCF REST Service as a POC.

Steve, has a really nice post on how to go about this. Did pretty much everything mentioned. But my REST Service used POCO classes as both the EF 4.0 Model as well as DataContract, (just for the sake of faster turnaround time of the POC) and a  sample of the POCO looks like :

    [Serializable]
    [DataContract]
    [KnownType(typeof(Quote))]
    [KnownType(typeof(Address))]
    public class Customer
    {
        [Key]
        [DataMember]
        public int CustomerID { get; set; }
        [DataMember]
        public string PrimaryInsurerFirstName { get; set; }
        [DataMember]
        public string PrimaryInsurerLastName { get; set; }
        [DataMember]
        public int PrimaryInsurerAge { get; set; }
        [DataMember]
        public virtual ICollection<Address> Address { get; set; }
        [DataMember]
        public virtual ICollection<Quote> Quote { get; set; }
          }

As per Steve’sCode sample, used WCF Web API 4 and included necessary Media Type Formatters and all the associated infrastructure. Instead of typical 
RouteTable.Routes.Add(new ServiceRoute("Service", new StructureMapServiceHostFactory(), typeof(Service)));

i used RouteTable.Routes.MapServiceRoute<Service>("msi", config); (WCF Web Api extensions )

But as soon as i try to access the root of the service (http://localhost/Service) got the following exception, and it was not at all hosting the REST Service as before :


Looking at the error its clear that Serialization of Interface is not possible using XMLSerializer, hence using List<Address> solved the error. :) 

But the question is why did this error occur? Earlier i had the same Datacontract and it worked perfectly fine. So what happened when i implemented WCF Web API 4.0 .


First thing was to figure out why the service is not getting Hosted/Started properly. Ideally WCF should throw error when we try to call  Operation/Method which returns or accepts Customer, a runtime exception maybe. But this was more of Compilation Error in a way,  that for any request associated with this RestService , it was not able to start the service. 

Hence using reflector, and tracing out the entire WCF Request Processing Pipeline,

I conclude that :

          In order to Host/Start a Service, the runtime loops through all the Operations in a ServiceContract and makes sure that Service is well formed before it accepts any incoming requests. This is accomplished using  “DispatcherBuilder.BindOperations()”

          WCF Web API extends typical WCF Dispatch Behavior and uses XmlFormatter by default, while WCF 4.0 uses DataContractSerializer by default.


As per above If i comment out the Method which works with Customer Object, everything works fine and the service gets hosted as before without issues. But we just cant do that!!

Now we can solve this by :
1.  Change all the Interfaces to Concrete Implementation in the Customer POCO.

2.  Add the [DataContractFormat] attribute for the Service Contract and override the default XMLSerializer used by WCF Web API 4.0.


WCF REST Request Processing Pipeline

Generally we dont feel the need to know what exactly happens under the hood when you specify a REST Endpoint  while hosting your REST Service , 
RouteTable.Routes.Add(new ServiceRoute("CustomerExperienceService", new StructureMapServiceHostFactory(), typeof(CustomerExperienceService)));

We take for granted that WCF Runtime will host the service endpoint for us and it will be work as expected.


But i encountered a scenario, wherein the service wont start/hosted at all due to a error.  It just didnt hit any of breakpoints in the ServiceContract constructor or any of the Operations (Methods) , surely something was wrong with ServiceHosting process.

Hence using Reflector, i decided to take on the challenge of deciphering the code that makes our lives so easy. "A picture is worth a thousand words",  hence  a  block diagram would make it easy to understand : 

One important learning that i would want to share here is that , because of    

<system.serviceModel>
    <serviceHostingEnvironment aspNetCompatibilityEnabled="true"/>
    <standardEndpoints>
      <webHttpEndpoint>
        <!--
            Configure the WCF REST service base address via the global.asax.cs file and the default endpoint
            via the attributes on the <standardEndpoint> element below
        -->
        <standardEndpoint name="" helpEnabled="true" automaticFormatSelectionEnabled="true"/>
      </webHttpEndpoint>
    </standardEndpoints>
  </system.serviceModel>

the runtime calls DispatcherBuilder.InitializeServiceHost() only when there is a request for a particular REST Service, pretty much same like Asp.Net application. 

And when DispatcherBuilder.InitializeServiceHost() calls DispatcherBuilder.BindOperations() , all of the operation contracts under a ServiceContract are looped to ensure that WCF is able to process any request that comes in. The appropriate Formatters (XML or DataContract Serializers) are identified for each of the Operations and a check is performed whether Serialization/Deserialization of parameters is possible or not. 

Hence in the scenario i mentioned in other post, if i comment out the Operation which accepts or returns the Customer Object, the Service was getting hosted fine without any errors.

To conclude :  while Hosting the REST Service, the WCF Runtime loops through all of the Operations (via  DispatcherBuilder.BindOperations() ) you have in a ServiceContract and as it goes along, it also makes sure that Serialization of parameters is possible so that it can process any subsequent requests. Only if this check is success , the service will be hosted otherwise you will  see the specific error without any breakpoints being hit on your ServiceContract.